The key was finding a quick and simple solution to simplifying the mesh without loosing too much key topography. I was using the free app MeshLab to convert the sculptris models to the STL format that 3d printers use.. and then i happened upon its other features... most useful of them being the "Quadratic Edge Collapse Decimation" (found here in the top menu- filters/Remeshing,Simplification and Reconstruction).
anyway heres the basic workflow to get a fully textured sculptris model to your fav 3d program with minimum effort
(I've only done this with 3dsmax so far, should be same for other programs as well).
Before you start get Meshlab from this link. Instal it and run it.
Step1-
Export your hirez model from sculptris. I did it before i had done the texturing, and then imported the simplified model back in to Sculptris to do the texturing. This way when you re-export it with the textures, you won't have any problems in your animation software.
Step2-
import the Obj file into Meshlab. At the bottom of the screen in the pink bar, it gives you the number of vertices and faces. If these numbers are too high, the model will be difficult to work with in most animation software... even the high end ones.

Step3-
From the top menu go to filters/Remeshing,Simplification and Reconstruction and click on "Quadratic Edge Collapse Decimation" you'll get this box
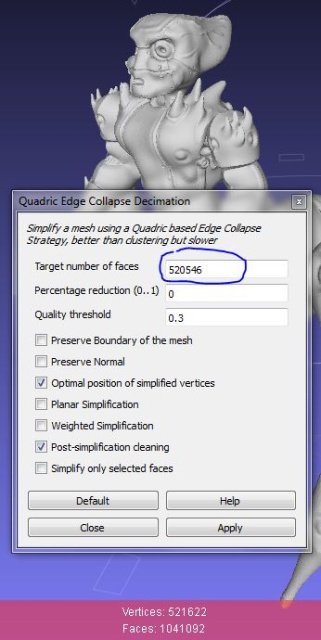
i left all the settings intact and just changed the "Target number of faces" to a more manageable number...
do this by reducing the number a little, hitting apply and then checking that your not loosing too much topography. i did this process a few times before i got to 220546 faces (from previous 1041092 faces)...

which i knew my machine would be able to handle in 3ds max. it will be different for you depending on your machine's specs and the animation software you use. i suggest tying to get it to less than 500000 to 300000faces.
:idea: note: if you'r reducing the mesh detail for other purposes like 3d printing, you need to tweak some more settings, see these instructions for a detailed breakdown on those.
Step4-
Export/save as obj again and open in Sculptris. do not edit the mesh anymore, just hit the "paint button" and do the texturing, painting.. bump mapping etc.. :lol:

Step5-
export as obj again. this time it will save texture coordinates with the file, which will be needed by your animation software.
Step6- export all the maps.
click the "show advanced tools" dot just under the texture boxes

from here you can export the texture map and bump and normal maps.

Step7-
import the obj file into 3ds max using the default settings. pick an empty material slot.. name it what you like.
add the texture map image you got from sculptris to the "diffuse" slot of the material
add the bump map image to the "bump" slot .. :whistle:

Step8-
apply this material to your model, and the textures should all be in their right places :)
with some basic day lighting my model looks like this
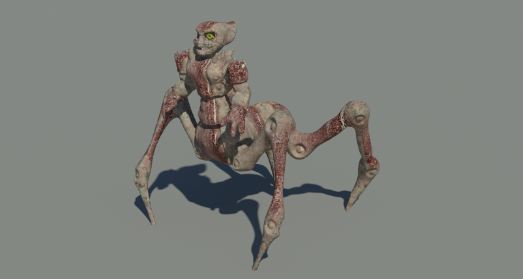 :yes:
:yes: after tweaking the lighting i got better results. and then after rigging it and animating a "crawl" cycle i got some acceptable footage(didn't know what to do with the arms :ko: ). see the latter part of the video below to see how that turned out. :coffee:
here are some pics of the rig

I just concentrated on the spine and legs.. gave some ik constraints for the legs and some blank objects(non renderable) with which to manipulate them.

sculptris centaur from chaitanya krishnan on Vimeo.
if the video takes too long to load, here it is on youtube as well(has 4 video quality/bitrate/speed/etc. options).
UPDATE
someone asked me about this on twitter, so i thought i'd mention it here as well. You can use this same technique to bring hirez models from Zbrush to the animation software you use(3ds max, Blender, maya, etc). basically most sculpting software output really complex geometry, which standard 3d modelling and animation apps find difficult to handle. It always makes more sense to export a Normal map or Bump map of the hirez model and wrap it on a simplified model. To know more about Normal maps and bump maps click here and here, or look at the help/documentation of the software your using.
Infact this is how pretty much all animators and game modellers do it.
9 comments:
Renegade writes:Very helpful thanks very much.
glad you guys liked it. do share links of any stuff you did after seeing this .also any other tips you may have are welcome, that way it can be even more helpful to others.thanks
Anonymous writes:I agree, very helpful.
Maulsmash writes:My thoughts you can do this and have more control over your animated mesh by sculpting a base mesh in 3ds Max first. Create UV maps for the mesh. Then bring in a copy into Sculptris...add details...then save that mesh. Then use xNormal to bake the normals of the highpoly mesh onto the base mesh. Then load your baked normal to the base mesh in 3ds Max to add the details...and animate away. I'll have to try this, but should work.
Originally posted by anonymous:My thoughts you can do this and have more control over your animated mesh by sculpting a base mesh in 3ds Max first. Create UV maps for the mesh. Then bring in a copy into Sculptris...add details...then save that mesh. Then use xNormal to bake the normals of the highpoly mesh onto the base mesh. Then load your baked normal to the base mesh in 3ds Max to add the details...and animate away. I'll have to try this, but should work.what you suggest is actually how most people do it already. the technique i've shown here is for those ppl who have already modelled something complex in sculptris(or zbrush) and are now wondering how to animate it. thanks for your input, really appreciate it. thanks
James writes:Perfect tutorial to a problem im facing, cheers dude!
Originally posted by anonymous:Perfect tutorial to a problem im facing, cheers dude! :) glad i could help!
Anonymous writes:hello, nice model and thank you for this tutorial but i'm having some problems. When I try to import my model back to sculptris I get this message: 'too many triangles connected to an edge (max 2)' Any idea what I could try? Thank you,
Originally posted by anonymous:too many triangles connected to an edgeall i can think of is that somewhere in your model theres a polygon with more than 4vertices. you'll need to connect them up. if thats not the case, use meshlab to re-convert your model.
Post a Comment