Wednesday, October 28, 2015

360˚ image overlayed with animated clips..

360˚ video overlayed with animated clips.. note: Google Cardboard compatible!!


Shot with a nexus 5
Illustrated and animated with a wacom and flash

sound from https://www.freesound.org/people/Pjkasinski3/sounds/171699/#comments

Heres my previous post, a tutorial on how to turn your photospheres into 360˚  youtube videos.


360˚ video shot with a Mobile Phone


This worked.. can't believe it worked.
My first 360˚ video(non cg mostly).. shot with a mobile phone.

Its rough and simplistic.. but proof of concept.
Heres how you do it.

Step1:
Shoot a photoshphere of the space you want a 360˚ video of. this will be a still photograph.. but we'll use it.
NOTE: not all phones can shoot a photosphere.. I used a 2yr old Nexus 5 

Its basically a 360˚ photograph that the nexus' default camera can shoot.
If you have a non nexus android phone, you can install the camera from the play store and see if the Photosphere option is available.


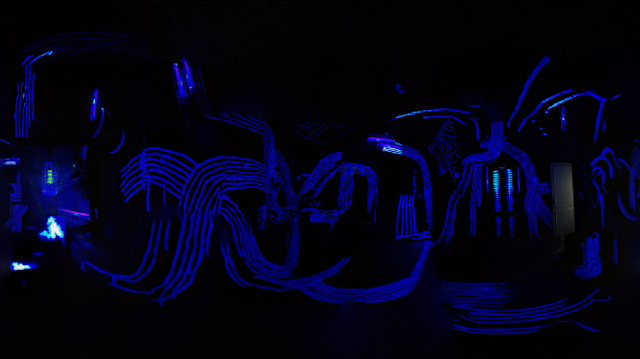
This is the Photosphere I shot. Its an installation I worked on with the artist Pith Bull. I created 3d objects and installed them all over the space and she created these lines, dots and shapes that run all over the room and the objects..

The whole space is lit by UV light. I was looking for a way to document it that would give the viewer a sense of immersion that the space had.. regular photographs were just not cutting it. The space was created at Walkin Studios in Bangalore.. do visit, if your in town.

Step2:
Shoot some short video clips without moving the camera. 
So basically footage of various moving elements in that space..
note: these are elements that move.. yet stay in the same spot..
ie: rotating objects, flapping pages, curtains, computer screens.. person sitting/standing in the same general area and talking..

try and get at least 4- clips.


here are the 2 clips i actually shot and posted on instagram.. and then later realised i could use here..
A video posted by chaitanya krishnan (@c2ktheotherartist) on


Step3:
After downloading the photosphere and the clips to your computer.. heres what you do. I used Adobe After Effects, but you could do this with any video editor/compositor that lets you align and compose clips this way.. 

Basically I used the photosphere as a base layer.. and overlayed the video clips over it.. aligned to their corresponding spots on the photograph.. some feathering to remove the sharp video edge.. and voila. Export a mp4

Step4:Go to this page and follow the instructions by Google, or read on below.


  • Download the 360 Video Metadata app for Mac or Windows
  • Un-zip the file, then open the 360 Video Metadata app. If you're on a Mac, you may need to right-click the app and then click "Open"
  • Select the video file
  • Click "Inject and save"
  • Enter a name for the file that will be created
  • Save the file. A new file will be created automatically in the same location as the original file
  • Upload the new file to YouTube
  • Wait for the 360 degree effect to process. This may take up to an hour.


  • Step5: 
    send me links to what you did on twitter @chaitanyak or in the comments below.